Author: All Out Tile & Grout

Tips To Prevent and Remove Mold from Grout Lines

Mold poses serious health risks to you and your family. Making sure that your home is mold free comes down to having the right tools and knowledge to prevent it from growing in places that are susceptible. One of the hotspots for mold growth in any home is in the bathroom or kitchen, specifically in the grout lines between your tile. But how exactly can you prevent mold growth on surfaces that are constantly wet? We put together this article to illustrate a few concrete tips to prevent and remove mold from your tile’s grout lines.

How Does Mold Grow On Grout Lines

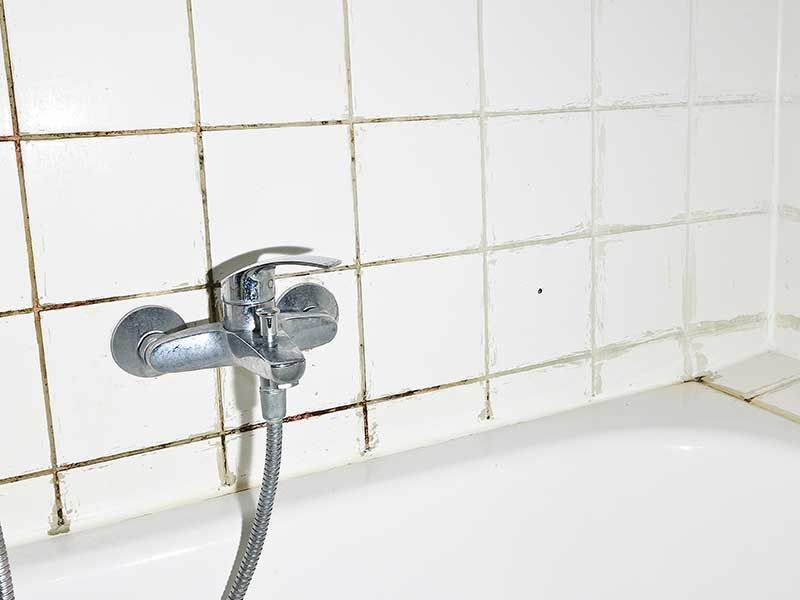
Mold is prone to growing in any environment that has warm temperatures, poor air circulation, and moisture. You can likely already see why bathrooms and kitchens are such hotspots for it. However, another key aspect of its growth is that it can grow in porous materials before you can even physically see it, and that means your grout is the perfect place for it to hide.

Protip: Mold growth causes discoloration in grout and can be extremely difficult to remove once it sets in.

Removing Mold From Grout

By using a few common household items and some solid elbow grease, you can reliably remove small mold buildups. For serious mold issues it’s always best to contact a professional, like your friends at All Out Tile & Grout, to assess and deal with it in the best way possible.

The most important aspect of cleaning mold from grout is what solution you use. We will be covering multiple methods for different cleaners, such as baking soda and vinegar, bleach, and hydrogen peroxide.

Protip: Never mix chemicals together, even household items. You may accidentally end up creating something more hazardous than the mold you are trying to remove!

Baking Soda

The first cleaning product you can make is made of something almost everyone has in their home: baking soda and vinegar. Obviously when mixed together they create a volatile reaction, but we can use that to our advantage for cleaning purposes. Here are a few methods to cleaning with baking soda:

Using a damp sponge, cover it lightly in baking soda before scrubbing the area. Let it sit for a minute or so before washing away with a warm water and vinegar solution made with equal parts.

You can also create a past made of a few teaspoons of water and about ½ cup of baking soda. Apply directly to the moldy spots and let it rest for 10 minutes. Then rinse it down with the vinegar solution.

The last way you can use baking soda is by mixing a ½ cup with a gallon of water, which creates a cleaning solution that can be sprayed on all of the problem spots. It’s better to let this sit for up to 30 minutes before rinsing but cleaning up is the same as the previous methods.

Bleach

Bleach is a far harsher chemical than baking soda but it has the ability to break through soap scum, reverse staining and kill some types of mold spores as well as general bacteria.

Protip: It is a common misconception that bleach kills all mold types. If you try applying bleach and see no results, more bleach will not solve the problem and it may be best to turn to a professional.

However, keep in mind that bleach gives off harmful fumes that can irritate your skin, eyes and lungs. When using bleach make sure to employ protective equipment like safety glasses, rubber gloves or even a face mask. Especially if you are in a room where you can’t open a window. With those things in mind, let’s examine the methods.

The first method is pretty straightforward. By simply scrubbing the affected area with bleach and a stiff-bristled brush, letting it sit for 15-30 minutes and rinsing with warm water, you get a solid and effective mold removal.

If there is a large area or deeper spores then you can instead create a solution of 4 parts bleach to one part water in a spray bottle. Apply it to the moldy grout and let it sit for 30 minutes before brushing the grout with a similarly stiff-bristled brush. Rinse and repeat as necessary.

Hydrogen Peroxide

Possibly the best chemical to use for removing mold is hydrogen peroxide. It kills several types of mold and fungi while having the added benefit of not producing harmful fumes. It can however cause fading and discoloration within your grout so this is really more recommended for older grout that may already have fading.
Circling back around to the paste method of application, peroxide can be mixed with white flour (as using baking soda will create an adverse reaction). The steps are identical with this paste, just apply to the affected areas, let it sit ideally overnight if you don’t have pets or small children, and then rinse it off with cold water.
It can also be used by itself as a cleaning spray. Just apply via spray bottle to problem areas, wait at least 10 minutes before you rinse, and wipe away the remaining peroxide. You can safely combine hydrogen peroxide and baking soda to create a similar reaction to the baking soda and vinegar approach above. First, create a baking soda paste and spread it over the area. Then, carefully pour some hydrogen peroxide over the paste and allow it to fizz. This both loosens dirt and mold and kills bacteria.

How To Keep Mold From Growing In Grout

Preventing mold is much easier than removing mold and will save you a ton of stress and time in the long run. Here are a few simplified steps for keeping that icky mold from sprouting up in the first place.

Clean your grout regularly- This may be the most common sense prevention method but it truly ensures you won’t be dealing with mold down the road.

Get your grout professionally sealed- Sealing your grout on a regular basis means that there is a physical barrier between the grout and any potential mold.

Utilize air circulation- Dispersing warm or humid air also helps keep mold at bay. If it isn’t warm and slightly muggy on a regular basis, mold won’t grow in the first place.

Use anti-mold products- Specifically, you can have anti-mold grout installed or buy a mold prevention solution from a store.

Ultimately if the mold is too fierce for you to face on your own you can always rely on the professionals and All Out Tile and Grout to inspect, assess and remove any and all mold to keep your living space safe!

Key Takeaways:

From baking soda and vinegar to bleach or hydrogen peroxide, there are several options for removing mold from your grout. Just be careful not to mix chemicals, don’t apply too much of anything with harmful fumes, and allow your chosen cleaning solution to sit long enough to get the job done. Prevention can be a better option, however, and nothing beats a regular cleaning, both by you and a professional.
Types Of Tile And Grout In Your Home

When it comes to tile and grout there are many different types that you will find inside a home or business. From ceramic to porcelain tiles, which are the most common, to glass, stone or cement, they all have their own unique benefits. Some are easier to clean and last longer while others look better or are more cost effective. If you are wondering what tile and grout is in your home and how best to keep it clean and well kept, you can use this as a guide for the ins and outs of different kinds of tile & grout!

The Most Common Types Of Tile & Grout

Ceramic Tile

First we will look at the most common type of tile found in homes and businesses: ceramic tile. Known for its durability, ceramic tile is so common because it is easy to install, easy to clean and can be found in almost any style and color. You also have the option of getting glazed tile that has the added benefit of being more durable. Overall, ceramic tile is both versatile and simple to care for. Washing weekly with a store bought cleaner or basic water and vinegar solution can maintain them over time and having a professional cleaning every six months is more than sufficient!

Porcelain Tile

The next most common type of tile and grout is porcelain. Now you may think that this is the same as ceramic tile but it has a few key differences:

It can often be used outside as it withstands weather and adverse temperatures.
It is fade and crack resistant so it is also often used in high-traffic areas.
It can mimic wood or stone textures while also needing less upkeep.

Porcelain, while being slightly more expensive but still economic, is still a regular choice for many homes. Keeping porcelain clean is also relatively simple and only needs weekly maintenance.

Glass Tile

Glass tile provides a clean and minimalist look to any home but is much less common due to it’s biggest drawback, being fragile. You will likely never see glass tile used for floors as it chips extremely easily, but is often used in sink backsplashes. It does however clean extremely easily. Simply wiping it down regularly and using simple cleaning methods like soap and water will be sufficient for glass tile.

Cement Tile

Next we will look at a more traditional tile type that isn’t found in many buildings anymore. Cement tiles come in extremely varied and beautiful styles. They also have the benefit of being able to be sanded and resealed, much like wood floors, if they begin to lose their coloration. However, because they are so porous it means that they need a bit of extra care.

Protip: Resealing them on a monthly basis is important for maintaining their look and preventing stains.

Cleaning cement tiles can also be a challenge because they are sensitive to high pH solutions and can be scrubbed away if the cleaning device is too abrasive.

Marble Tile

Another less common type of tile is marble tiles. Marble offers a touch of elegance at the cost of durability. Like most stone-based materials it is extremely susceptible to scratches and stains. Because of this cleaning marble tile is also more of a chore if you want to keep them looking pristine. We recommend having them professionally cleaned more frequently and only using gentle methods for daily or weekly maintenance.

Another stone material, granite, is similar to marble in its look and feel but different in its price point. Cleaning granite tile also takes a bit more care.

Different Grout Materials

Aside from tile there are also three main types of grout that can be used. Usually what type of grout you have in your home is dictated by how thick the grout lines between the tiles are, but they all have their own care protocol.

Cement Grout

Typically used for tile that demands extra durability in the joints, cement grout can be divided into two subtypes. Sanded and unsanded.

Sanded grout- this is a mortar base that has sand added to it and is favored when the grout lines are above ⅛ of an inch. The presence of sand contributes to the overall strength and durability but it attracts dirt and is extremely absorbent.

Unsanded grout-similar to sanded grout this type is made of water, cement and non-sand particles. However it is better for grout lines under ⅛ of an inch. You would typically see this in bathroom floors and walls.

Furan Grout

Furna grout is more common in industrial spaces and likely won’t be used in homes. It is composed of polymers of furfuryl alcohol. This means that it is resistant to wear and tear as well as much more scratch resistant than concrete grout.

Epoxy Grout

Often the industries favorite type of grout, epoxy resins are mixed with hardeners to make an incredibly durable material that is suitable for almost all tile types. It is also very easy to clean on a regular basis.

Key Takeaways:

With a plethora of tile types like marble or porcelain, there are different considerations to how you clean your floors. In almost any case, weekly cleaning with soap and water can provide decent maintenance, but regular professional cleaning will ensure that more sensitive tile & grout types are kept in peak condition.

The Best Way To Clean Bathroom Tiles

In most people’s homes, the bathroom is a place that sees daily traffic. Especially the bathtub or shower. If your bathroom has tiles, either on the floor, the wall or in the shower it is important to keep them clean. Water scale and lime build-up can damage your tile over time and make keeping them clean a challenge. The best thing you can do to avoid this is clean them regularly. But you may be wondering what exactly is the best way to clean bathroom tile. We put together this comprehensive guide to give you some ideas on where to start and what to use!

Types Of Tile Cleaning

There are a few ways to tackle cleaning your bathroom tile, depending on how soiled they are. While soap build-up and dirt are easy to get rid of with milder cleaning solutions, things like grout staining and limescale require more heavy-duty cleaners and equipment. Here is a breakdown for both methods!

Basic Tile & Grout Cleaning

First, let’s look at what kind of solution and cleaning equipment we need:

  • Water & vinegar in equal parts, lemon juice, and baking soda, or a store-bought cleaner
  • A cloth or rag
  • A hard bristled brush
  • Gloves
  • Sponges

With our materials collected, we can begin the cleaning process!

  1. Apply the cleaning solution. There are a few options for the cleaner used. Vinegar is great for cleaning tile because it bonds to dirt and grime, making it easier to wipe up. Lemon and juice and baking soda is another great approach that uses common things found around the home and it has the added benefit of making your bathroom smell nice! Store bought cleaners are perfectly fine too, as most contain chemicals that break down soap and dirt.
  2. Allow the solution to sit. Regardless of what cleaner you chose it is important that you allow it to sit. This ensures that everything you are trying to clean properly binds to the dirt, soap and scum.
  3. Agitate the area. Utilizing a brush or a sponge, scrub the area where the solution has been sitting. The tough spots may need some extra love and a second coat of cleaning solution.
  4. Wash the tile. You can either use a clean cloth or turn your shower on and use the water to rinse away all of the cleaning solution. Alternatively, you can turn the heat up and allow steam to build up which can further break down any remaining dirt.
  5. If you notice any remaining stains you can repeat the process until they are gone. While this kind of cleaning is great for weekly cleaning and maintenance, deep stains and scale build up will need a different approach.

Heavy-Duty Tile & Grout Cleaning

While the steps are the same as listed above, for the harder-to-clean stains and scale you have to rely on heavier chemicals and more professional equipment. This level of cleaning is best handled by the experts at All Out Tile and Grout, but there are still some things you can do to get that like-new shine from your bathroom tile.

Perhaps most importantly we need a more effective cleaning solution. Things like ammonia and bleach are useful for de-staining, though you may need a de-lime solution in order to remove the water scale. You can also create a very effective cleaner from ½ cup of baking soda, one teaspoon of liquid dish soap, and ¼ cup of hydrogen peroxide.

Protip: Whatever you choose to work with, make sure you do not mix any chemicals. For example, mixing bleach and ammonia creates a toxic gas that is incredibly harmful.

Another way to clean tile more effectively is with a steam cleaner or bristled agitation machine. These can be a bit expensive but offer more consistent deep cleaning for your bathroom. Steam specifically exfoliates dirt particles, making routine cleaning much easier.

How Often Should You Clean Your Bathroom Tile

As mentioned above, maintenance should be weekly but there are several factors that affect that recommendation. The longer you wait between cleanings the harder scrubbing off dirt buildup will be. This also plays a key role in preventing mold and mildew buildup, which can be harmful to you and your family’s health. A weekly cleaning followed by professional deep cleanings every 6 months is ideal for keeping your bathroom clean and your home healthy.

Key Takeaways:

Bathroom tile cleaning is something that should be done regularly. You can utilize basic home ingredients like vinegar, baking soda, and lemon juice to create a useful cleaning solution that powers through the dirt. By letting this solution sit for several minutes it will bind to dirt and grime then be washed away with a thorough rinsing. When dealing with intense stains you may need to use chemicals like bleach or ammonia but ensure that you do not combine them.